This is another recipe from my Nana Carrie. She grew up in Santa Clara and the family worked in the orchards and canneries. Prunes were a staple product of the valley. Here is her recipe for Prune Cake. Every year at Christmas time my mom and I chat about making it in regular size loaves, mini loaves and muffins. The original was meant to be a loaf or "cake." In current times prunes have gotten a bad rap so I sometimes just tell people it's a portuguese bread. This year when I revealed my secret ingredient, most people were excited to try something new and even said how much they enjoy prunes. And really, they are only giant raisins. ;)
Nana's Prune Cake
3C flour
1C sugar
1C oil
1C milk
1C chopped nuts (optional)
1C chocolate chips (a must!)
1 1/2 tsp baking powder
1 1/2 tsp baking soda
1/2 tsp nutmeg
1/2 tsp cloves
1/2 tsp cinnamon
1 lb (20oz) bag of prunes (cook and chop)
To cook prunes: add prunes to a med pot with 2 C water. Simmer over med-high heat until turning light brown and soft. Reserve cooking liquid and let cool. Chop softened prunes in food processor.
Preheat oven to350 deg F.
Mix all ingredients in large bowl. Use as much of the reserved liquid as needed to create a smooth pancake like batter. The batter should have a light brown color.
Transfer to a loaf pan.**
** I also like making mini loaves and the recipe will make 5 mini loaves. You can also bake in a 9x13 cake pan. My mom recently made them into mini muffins.
Bake @ 350 for 45-50 minutes or until center comes out clean.*
* mini muffins: bake for 30-40 minutes.
Thursday, December 29, 2011
Thursday, November 3, 2011
Pumpkin-Sweet Potato soup
This soup was whipped up just in time for Thanksgiving! It can also be recreated with leftovers after the big feast. I used what I had in my fridg.
 Ingredients
1tbs oil (canola, or olive)
1 small onion, chopped. I used a walla walla from this year's home garden
1 tbs minced ginger
1tsp cumin
1tsp yellow curry powder
salt & pepper to taste
6 C clear broth (I used 2 cups turkey broth, 2 cups mushroom broth and 2 cups water)
1/2 lb canned pumpkin (this is from the big can not the 15oz ones. You could use a whole 15oz can)
3-4 C mashed sweet potato (I am estimating since I used leftovers.)
1 med yukon gold or russet potato (you could easily use 1-2 cups leftover mashed)
1 C coconut milk (optional)
Using a stock pot add oil and chopped onion. Cook for 5 minutes until tender. Add ginger and let cook for 1 minute to combined flavors.
Add all potatoes and broth. Heat on med high until simmering.
Add spices and turn heat to med low. Let simmer 30-45 minutes or until potatoes are tender and flavors have combined.
Add coconut milk and use immersion blender until smooth and creamy.
Serve in soup bowls and sprinkle with raw unshelled pumpkin seeds.
Monday, July 4, 2011
A taste of Hawaii
I've been getting back to my roots lately and that means I'm taken back to Hawaii. I have a couple of family Portuguese recipes on here but this one is straight up Hawaiian. Anyone whose been to the islands know that you can't have a lunch plate without a mac salad. So here is my version of that great little bite!
Hawaiian Style Mac Salad
Hawaiian Style Mac Salad
- 3 cups macaroni (any kind that tickles your fancy. I let the kids choose.)
- 1/4 cup grated carrot
- 1 cup mayonaise (NOT Miracle Whip)
- 1/4 cup milk
- small can of chopped black olives, drained
- 1/4-1/2 cup grated or chopped onion. I use whatever I have and this can include shallots or green onion as well as red or yellow.
- salt & pepper to taste
Directions:
- Cook macaroni till tender. Drain and rinse in cold water.
- Add ingredients until well coated. Salt & Pepper to taste. Use more mayonnaise if needed.
- Chill in refrigerator.
- When ready to serve, add more mayonnaise to keep salad from drying out.
Saturday, June 18, 2011
What Picky Eaters Eat and those who love them!
My first born was not always a picky eater, but as time went on and we realized what a quirky kid he was becoming (which includes declaring he's a vegetarian at 3 1/2) his eating habits also changed. He's a kid who will eat the same kind of sandwich everyday and be upset if you change any part of it. This sandwich is a peanut butter (smooth kind) and Nutella sandwich on "circle" bread. (The kind that is thin and round and whole wheat) That's it. With a big glass of milk and an apple if I'm lucky. I do have to admit they are delish, but I don't want them everyday! Anyway, dinner can be an exhaustive challenge and I almost always have plain rice or plain noodles so the child won't starve. Oh yeah, and he also likes seaweed. Yes, the sheets. Of nori. To eat right out of the package. I just go with it and I just found out that seaweed actually has more vitamin C than oranges! So. Tonight I made hand rolls for the kids with edame (or biggy peas as we call them) and carrot sticks on the side with their big glasses of milk. Huge success! This was sooo easy and can easily be eaten for lunch or even as a snack. You can add all kinds of yummy foods to it as well. I am not going to give you a whole recipe because it doesn't need one, but I will give you a list of things that can be added.

The hand roll has 2 basic ingredients: RICE & NORI sheets.
STEP 1: Cook up your white jasmine rice in the usual way. I always rinse first and drain and then add the water. Usually 2 cups rice to about 3 to 3 1/2 cups water. Less water tends to make it stickier, especially if you've rinsed first. If you do the rice this way you can just put some in the nori without having to make it "sushi style."
STEP 2: Cut the nori sheets in half. My kids ate 2 hand rolls easily and this equals 1 whole sheet.
STEP 3: Once rice is cooked scoop about 1/4 cup (more or less) of rice and pack it onto one end of the seaweed sheet.
STEP 4: Roll up nori so that it creates a cone of rice and has a point on the end. Mine were not perfect and I could easily turn up the bottom once it was a bit soft. I added a link to a video that shows how to do all this. making the cones.
STEP 5: Once it is rolled up put a dab of rice on the flap end and stick it down so it does not unroll.
That's it folks! Pretty dang easy. The picky eater will only eat his plain this way but you can easily add up to 3 of the following ingredients or come up with your own. Let me know your favorites!
Hand Roll Fillings:
carrots sticks, thin
Cucumber sticks, thin
avocado
proteins like chicken, shredded pork, beef strips, and shrimp or other seafood
apple sticks
asparagus spears
jicama
parsnip sticks
sweet potato sticks
Be creative! Add 1 protein and 2 veggies. Thin crunchy veggie sticks work best. Grilled chicken strips or BBQ shredded pork would be yummy too!
Happy Eating!
Tuesday, May 17, 2011
Eat Your Greens! aka Fava beans and spinach pesto
I recently signed up for organic produce delivery. I love it! It forces me to eat more veggies and also try things I might not have before. Tonight I discovered some some and creative dishes.
Spinach and sunflower seed pesto.
I figured since traditional pesto was made with a leaf (basil) and a nut/seed (pinenut) why not try something outside the box? I had a bag full of baby spinach, courtesy of Full Circle Farm and a jar of sunflower seeds. Why not make pesto? The recipe that follows was inspired by Jaime Oliver.

As with traditional pesto, combine in food processor and slowly add EVOO until smooth. Feel free to play around with amounts as well until it agrees with your palette.
I left mine a little crunchier and spooned it over a tortellini. It was pretty dang yummy!
I was on a roll with the the greens and was dying to try the bag of fava beans in my organic mix so the recipe that follows is a nice little side dish.
 Fava Beans tossed with parmesano reggiano
1 C fresh fava beans shelled.
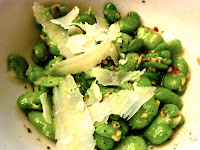 So, Fava Beans are a thick bean that is encased in a pod and looks like a giant snap pea. Crack it open from an end and pull it apart. Inside are the beans. Do not eat these raw. The first step is to boil a small pot of slightly salted water. Once boiling, throw the beans in for about 1-2 minutes. Drain and rinse. THEN, you must pop the bright green beans out of their little jacket. It's a thick skin like little bean scuba gear. Once this is complete just add olive oil, garlic and red pepper to a medium hot pan. Toss the beans until heated through. Dish up. Add your salt and pepper and shave some cheese on and your done! Another option would be to forgo the heat and just mix the ingredients together (minus the garlic) and toss into a green salad.
Spinach and sunflower seed pesto.
I figured since traditional pesto was made with a leaf (basil) and a nut/seed (pinenut) why not try something outside the box? I had a bag full of baby spinach, courtesy of Full Circle Farm and a jar of sunflower seeds. Why not make pesto? The recipe that follows was inspired by Jaime Oliver.

2c spinach
1/4-1/2 c sunflower seeds
1/3 plus EVOO
2 cloves garlic chopped
1/2 c parmesano reggiano
salt and pepper.
As with traditional pesto, combine in food processor and slowly add EVOO until smooth. Feel free to play around with amounts as well until it agrees with your palette.
I left mine a little crunchier and spooned it over a tortellini. It was pretty dang yummy!
I was on a roll with the the greens and was dying to try the bag of fava beans in my organic mix so the recipe that follows is a nice little side dish.
 Fava Beans tossed with parmesano reggiano
1 C fresh fava beans shelled.
2 tbs. EVOO
1 clove garlic, chopped
pinch or small shake of crushed red pepper
salt and pepper to taste
1/2 c shaved parmesano reggiano

Monday, May 9, 2011
Make Your Own Salad Night
So I have some picky eaters in my house. Namely my husband, who could eat the same food every day for all three meals and be perfectly happy. The second is my gifted and sensory sensitive child who claimed himself a vegetarian by age 4 (including fish b/c he was NOT going to eat a dead fish) and who probably only east about 5 foods. He too will eat the same food everyday for every meal and is perfectly happy about it. It does mean making his lunch for preschool very easy and I can do it before I've had my coffee in the morning. Luckily, I also have a three year old who will happily ask for a steak and will eat a chicken wrap right out of my hand if I let him. Sadly, it makes dinner time for this Foodie an agonizing challenge. When the 4 o'clock hustle begins I dread trying to come up with something everyone will eat or even consider looking at. Once or twice a week we have breakfast for dinner so everyone is happy with their eggs, or pancakes, or cereal and most times they can even get their own food. I always leave a bowl or two of fruit out on the table and this has increased fruit intake by everyone, so thumbs up for that! The veggie situation is the next challenge and tonight I discovered some sort of success. Tonight was "Make Your Own Salad Night." Not sure why I hadn't thought of this before. We've had taco night which is a similar idea where everyone gets a tortilla and puts what they want. Kids LOVE this stuff! So I guess the little bits of sunshine we've had lately was just enough for my veggie garden tending to help set off this brilliant little light bulb. Funny enough, the recipe to "Make Your Own Salad Night" requires one of my famous "lists." I'm not necessarily a fan of lists but it does seem I'm kind of listy that way. So. This is how your family will LOVE "Make your own salad night."
1 bowl romaine
1 bowl red leaf lettuce
1 bowl mixed greens like arugula and kale and any other "fancy" looking leafy green
in separate bowls:
sliced cucumber
bite sized pieces or think slices of carrots
tomato wedges
raw mushroom slices
any other salad pleasing veggie cut thickly for finger food people
avocado chunked or sliced
little bowls or jam jars of dried fruit like blueberries, cranberries, or cherries (or all of them!)
little jars or bowls of raw seeds like sunflower, pumpkin, sesame, etc.
bowl of freshly chopped chives from the garden
My picky eater also brought to the table a plate of pickles and olives.
we added some hard cheese like parmesan reggiano so each person could grate their own. (I helped the left handed 3 year old)
And of course numerous salad dressings and croutons or bacon bits can be added as well as other proteins like shrimp or chicken or anything else you might put in a salad. The key is to have lots of options. Sometimes it's just the way it looks or feels in the mouth that gets them to eat it. My 3 year old likes his cucumbers peeled so I had little plate of sliced cucks both peeled and unpeeled.
I desperately wished I had a big lazy susan for this affair and I might go out and buy one tomorrow. Although without it, everyone got to practice their nice restaurant manners for passing food. From mom to mom, let me tell you, this was a huge success! We put the larger salad bowls out and then put little dishes on the side for those who want rice or maybe pasta or even a protein (and the picky eater's seaweed. Yeah, I know, I just go with it.) I used jam jars for the seeds and dried fruit and put spoons and forks out for serving. Let me tell you, everyone had fun and ATE the FOOD. They all asked for "Make Your Own Salad Night" again! Luckily for me I just signed up for organic produce delivery so that will keep the variety going. The bonus of it all, besides the eating was that even the little one could, and wanted to help set the food out. It was truly the family affair I never though would exist. Aaah. A mom's day is done.

Saturday, October 16, 2010
Honey Banana Bread
Searching for a banana bread recipe I decided to take the basic recipe and add my own flair with items on hand in my pantry. I discovered that honey flavored yogurt meant I didn't need vanilla and gave the bread a heavenly sweetness. A perfect slice or bread to have with hot tea on a chilly Autumn afternoon. Now, onto pumpkin carving!
Ingredients
- 1 C whole wheat flour
- 1 C all purpose flour
- 2 Tbs wheat germ (optional)
- 3/4 teaspoon baking soda
- 1/2 teaspoon salt
- 1 C organic sugar
- 1/4 cup butter, softened
- 2 large eggs
- 1 1/2 cups mashed ripe banana (about 3 bananas)
- 1/3 C honey greek style yogurt
- Cooking spray
Preparation
Preheat oven to 350°.
Combine the flour, baking soda, and salt. Place sugar and butter in a large bowl, and beat with a mixer at medium speed until well blended (about 1 minute). Add the eggs, 1 at a time, beating well after each addition. Add banana, yogurt. Beat until blended. Add flour mixture; beat at low speed just until moist. Spoon batter into an 8 1/2 x 4 1/2-inch loaf pan coated with cooking spray. Bake at 350° for 1 hour or until a wooden pick inserted in center comes out clean. Cool 10 minutes in pan on a wire rack; remove from pan. Let cool.
Subscribe to:
Posts (Atom)